> ## Documentation Index
> Fetch the complete documentation index at: https://allhandsai-docs-conversation-event-stream.mintlify.site/llms.txt
> Use this file to discover all available pages before exploring further.
# Manage LLM Profiles
> Configure models in Agent Canvas and use saved LLM profiles during conversations.
Agent Canvas supports configuring your LLM provider, model, and credentials from the UI. It also supports saved **LLM profiles**, which make it easier to switch models without re-entering provider settings each time.
LLM profiles can also generate conversation titles. In `Settings > Application > Conversation titles`, leave the selection on **Automatic** to use the active local profile, or select a saved profile dedicated to title generation.
## Configure an LLM Profile
Open `Settings > LLM` to add a reusable LLM profile. Use the **Basic** tab for a provider and model available in the dropdowns. Use the **Advanced** tab when you need to enter a model name and base URL directly. Use the **All** tab to view and customize the full set of model configuration fields.
If you are deciding between a provider key, local endpoint, LiteLLM proxy, OpenRouter, or ACP agent, start with [Configure a Model](/openhands/usage/agent-canvas/model-configuration).
ACP agents such as Claude Code, Codex, and Gemini CLI manage their own model access. See [ACP Agents](/openhands/usage/agent-canvas/acp-agents) instead.
### Choose a Configuration Path
| I have | Profile tab | Configure |
| -------------------------------------------------------------- | ------------ | ------------------------------------------------------------------------------------------------- |
| An API key from Anthropic, OpenAI, Google, or another provider | **Basic** | Select the provider and model, then add its API key or reuse a Provider Connection. |
| An OpenHands LLM API key | **Basic** | Select `OpenHands`, choose a model, then add the key or reuse a Provider Connection. |
| A local OpenAI-compatible server | **Advanced** | Enter the provider and exact model ID, then add its base URL/key or reuse a Provider Connection. |
| A LiteLLM proxy | **Advanced** | Use the `litellm_proxy/` model prefix, then add its proxy URL/key or reuse a Provider Connection. |
### Direct Provider
In the **Basic** tab, select your provider and model. Select a **Provider Connection** to reuse its API key, or add an API key directly when it belongs only to this profile. Save the profile, then use a new conversation to test the change; an existing conversation continues with the agent and model it started with.
For provider and model recommendations, see [LLM Configuration](/openhands/usage/llms/llms).
### OpenHands Provider
Use an OpenHands LLM API key when you want Agent Canvas to access models through the OpenHands provider:
1. Copy your LLM API key from [OpenHands Cloud](https://app.all-hands.dev/settings/api-keys).
2. In the **Basic** tab, select `OpenHands`, choose a model, and add the key.
3. Save the profile and start a new conversation.
While using OpenHands as your LLM provider you will see OpenHands-routed model IDs marked as `Free`. These models change as we have promotional periods where we can offer them without any additional token cost. Currently **DeepSeek V4 Flash** is the free OpenHands-routed model.
The `Free` label applies only to those full `openhands/` routes. Endpoints from other providers with similar model names may have separate billing. The label remains visible after you select one of these models.
When you create a local LLM profile, the form initially selects **OpenAI GPT-5.6 Sol** (the default model) and derives the profile name from it. You can change either value before saving.
For key details and available models, see [OpenHands LLM Provider](/openhands/usage/llms/openhands-llms).
### Pre-Save Validation
When you save an LLM profile, the configuration is validated against the backend before it is persisted. If validation fails — for example, because the API key is rejected or the model is unavailable — the save is blocked and the backend error is shown. The save button displays a validating state while the check runs.
Older backends that do not support validation (they return a `404` for the validation endpoint) skip this check and save normally.
### Local OpenAI-Compatible Endpoint
A local server can be LM Studio, Ollama, vLLM, SGLang, or another service that exposes an OpenAI-compatible API. In the **Advanced** tab, enter the provider, exact model ID, endpoint base URL, and the required API key or a placeholder value when the server does not require one.
The URL must be reachable from the **backend**, not only from your browser. For example, a backend in Docker cannot use `127.0.0.1` to reach a model server running on the host. Use the host address appropriate for that backend and confirm the endpoint's model inventory before saving.
For example, if the model server runs on the host at port `1234` and the Agent Canvas backend runs in Docker, configure:
* **Model**: `openai/`, replacing `` with the exact `id` returned by the server's `GET /v1/models` endpoint
* **Base URL**: `http://host.docker.internal:1234/v1`
* **API key**: `local-llm` or another placeholder value when the server does not require authentication
See [Local LLMs](/openhands/usage/llms/local-llms) for LM Studio, Ollama, and other local-server examples.
### LiteLLM Proxy
In the **Advanced** tab, use the model name format `litellm_proxy/`, then enter your LiteLLM proxy base URL and API key. The model name after the prefix must match a model configured on the proxy.
See [LiteLLM Proxy](/openhands/usage/llms/litellm-proxy) for the complete configuration.
## Provider Connections
Provider Connections are available on **local agent-server backends only**. The panel is hidden when using an OpenHands Cloud backend.
When you want multiple LLM profiles to share the same provider credentials, use **Provider Connections** to store a provider, API key, and optional base URL once and reference it across profiles. This avoids pasting the same key into every profile and lets you rotate credentials in one place. Linked profiles keep their own model selection while using the shared connection for credentials.
### Create a Provider Connection
1. Open `Settings > LLM`.
2. In the **Provider Connections** panel, add a new connection.
3. Enter a name, then select a provider from the searchable supported-provider selector, and add the API key and an optional base URL.
The provider field in the **create** connection flow is a searchable selector backed by the supported-provider catalog. You must select a supported provider before the connection can be saved. Existing connections retain free-text editing, so legacy or custom provider identifiers remain maintainable.
### Link a Profile to a Provider Connection
When you add or edit an LLM profile, choose a saved connection in the **Provider Connection** selector. Select **None** to use credentials specific to that profile instead. When a profile is linked, its inline API key and base URL fields are hidden — the profile uses the connection's credentials instead.
Linked profiles are grouped under their Provider Connection name in the profile list for readability. To use another model with the same API key, add another LLM profile, select the same connection, choose that model, and save.
### Update or Delete a Connection
Edit a Provider Connection to rename it, rotate its API key, or change its base URL. The update applies to every linked profile. Before deleting a connection, re-link or change every profile that uses it; Agent Canvas prevents deleting a connection while profiles still reference it.
## Working with LLM Profiles
LLM profiles are useful when you want different model setups for different tasks, such as:
* a fast profile for iteration
* a stronger profile for planning or review
* a local model profile for offline experiments
LLM profiles are separate from [Agent Profiles](/openhands/usage/agent-canvas/agent-profiles). Agent Profiles choose which agent runs a new conversation. OpenHands Agent Profiles reference an LLM profile to decide which model configuration that agent uses.
### Manage Saved Profiles
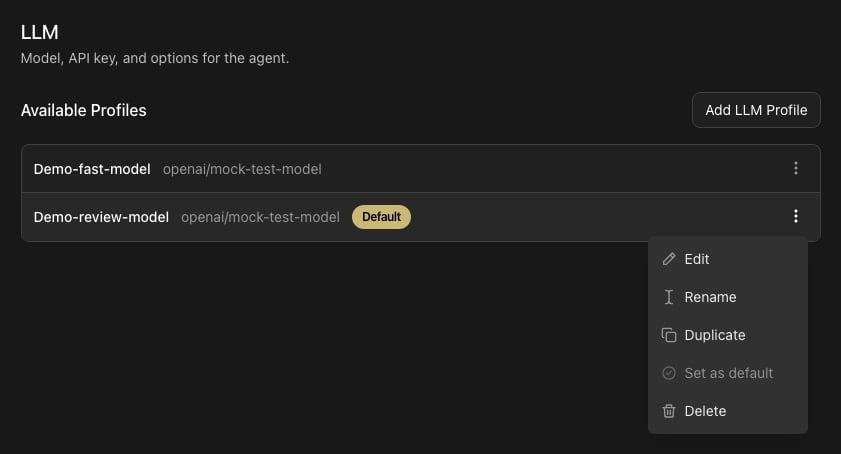
The available profiles list shows each profile's name, configured model, and whether it is active. Use a profile's menu to edit or rename it, set it as the active profile for new conversations, or delete it when you no longer need it.
 ## Switching Profiles in a Conversation
You can switch profiles from the profile selector in the chat input or with the `/model` command:
* `/model` — list the saved profiles available to the conversation
* `/model ` — switch to a specific saved profile
A switch preserves the conversation history, workspace, and task state; it applies to future model requests only. Agent Canvas also shows model-switch events in the conversation timeline so you can see when a profile changed during a task.
Model switching requires saved LLM profiles. If `/model` is not available in the chat input, create a profile in `Settings > LLM` and confirm that the active backend supports profile switching.
## Fix a Failed Configuration
| Symptom | Check first | Next step |
| ---------------------------------- | ----------------------------------- | -------------------------------------------------------------- |
| Provider is not recognized | Provider selection and model prefix | Use the matching configuration path above. |
| Model format or identifier error | Exact model ID | Compare it with the provider or proxy model inventory. |
| Local server cannot be reached | Base URL from the backend | Check host, port, and container or network reachability. |
| Authentication or permission error | Key type and backend scope | Re-enter the key or follow the provider guide. |
| Model cannot perform the task | Context and tool support | Choose a compatible model from the provider's recommendations. |
For error-specific steps, see [Troubleshooting](/openhands/usage/agent-canvas/troubleshooting#model-or-api-key-errors).
## Recommended Workflow
1. Configure and save a default profile in `Settings > LLM`.
2. Create additional profiles for specific tasks or cost levels, using descriptive names that make their purpose clear.
3. Open `Settings > Agent` and choose which LLM profile an OpenHands Agent Profile should use.
4. Start a new conversation and send a simple message to confirm the selected model responds.
5. Use the profile selector or `/model` when you want to switch profiles without leaving the chat.
## Related Guides
* [Setup](/openhands/usage/agent-canvas/setup)
* [Customize and Settings](/openhands/usage/agent-canvas/customize-and-settings)
* [Agent Profiles](/openhands/usage/agent-canvas/agent-profiles)
* [LLM Settings](/openhands/usage/settings/llm-settings)
## Switching Profiles in a Conversation
You can switch profiles from the profile selector in the chat input or with the `/model` command:
* `/model` — list the saved profiles available to the conversation
* `/model ` — switch to a specific saved profile
A switch preserves the conversation history, workspace, and task state; it applies to future model requests only. Agent Canvas also shows model-switch events in the conversation timeline so you can see when a profile changed during a task.
Model switching requires saved LLM profiles. If `/model` is not available in the chat input, create a profile in `Settings > LLM` and confirm that the active backend supports profile switching.
## Fix a Failed Configuration
| Symptom | Check first | Next step |
| ---------------------------------- | ----------------------------------- | -------------------------------------------------------------- |
| Provider is not recognized | Provider selection and model prefix | Use the matching configuration path above. |
| Model format or identifier error | Exact model ID | Compare it with the provider or proxy model inventory. |
| Local server cannot be reached | Base URL from the backend | Check host, port, and container or network reachability. |
| Authentication or permission error | Key type and backend scope | Re-enter the key or follow the provider guide. |
| Model cannot perform the task | Context and tool support | Choose a compatible model from the provider's recommendations. |
For error-specific steps, see [Troubleshooting](/openhands/usage/agent-canvas/troubleshooting#model-or-api-key-errors).
## Recommended Workflow
1. Configure and save a default profile in `Settings > LLM`.
2. Create additional profiles for specific tasks or cost levels, using descriptive names that make their purpose clear.
3. Open `Settings > Agent` and choose which LLM profile an OpenHands Agent Profile should use.
4. Start a new conversation and send a simple message to confirm the selected model responds.
5. Use the profile selector or `/model` when you want to switch profiles without leaving the chat.
## Related Guides
* [Setup](/openhands/usage/agent-canvas/setup)
* [Customize and Settings](/openhands/usage/agent-canvas/customize-and-settings)
* [Agent Profiles](/openhands/usage/agent-canvas/agent-profiles)
* [LLM Settings](/openhands/usage/settings/llm-settings)